(these instructions have been borrowed from a fellow teacher named Ms. Foglia. That is why her name is shown. But rather than write my own instructions, I am using hers, which are clear, concise and accurate!)
If you are not familiar with posting to blogs, read this quick how-to:
1. THE CONTRIBUTOR INVITATION
First, you will receive an invitation e-mail from me since I am the creator of the blog. The subject line of the e-mail will be "You have been invited to contribute to Ms. Olsson's blog", like this:

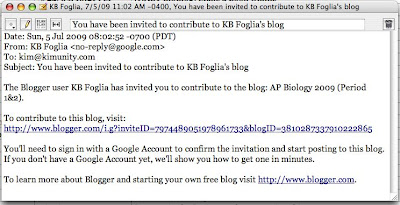
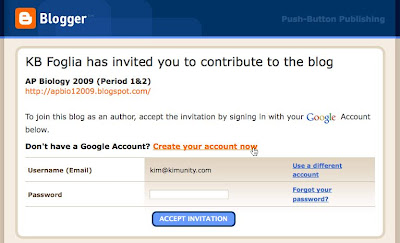
Click on the link in the e-mail and it will get you to a Blogger login page, like this:
2. CREATING A GOOGLE ACCOUNT
If you have a Google account, then fill this form out and click the "Accept Invitation" button. If you are not sure you have a Google account, assume you don't. If you don't have a Google account, then click on the "Create your account now" link and set up your account by filling out the form, like this:
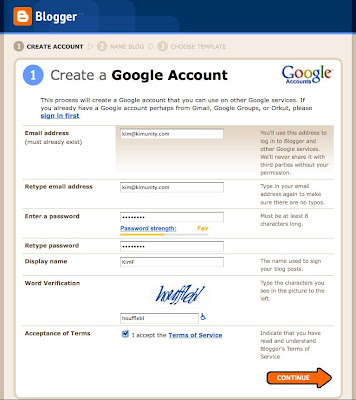
Just remember that your Display Name should be no more than your first name and your last initial. Never post your full name on the blog!
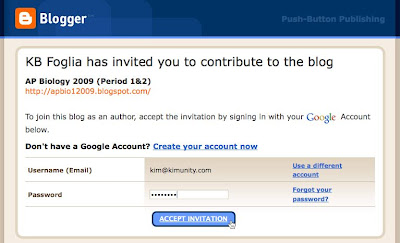
3. ACCEPTING THE CONTRIBUTOR INVITATIONOnce you set up the Google account, you will return to the login screen, so you can accept my invitation to be a contributor to the blog, like this:
 4. POSTING ON THE BLOG
Once you have created your Google account and accepted my Blog invitation, you will have a homepage that you come to that lists all the blogs that you are a member of. This page is called your "Dashboard" and will look somewhat like this:
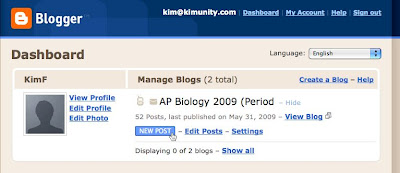 When you are ready to make your first blog entry -- to "post" to the blog -- you would click the "New Post" link and it will bring you to the post creator screen, like this:
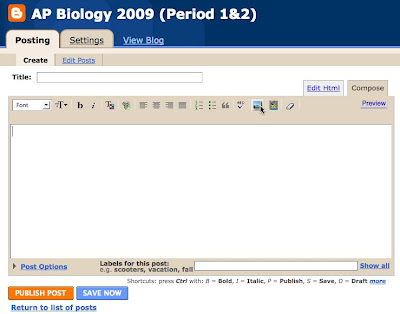 This is where you will write your blog entries and post your photos. In the image above, my cursor is on the "Add Image" icon. You can find out what each icon does by hold your cursor over it and a little text box will pop up to tell you what that icon does.
Notice at the bottom of the window, the field called "Labels for this post". This is where you can put in keywords that will be used to catalog your entry for searches. For example for the post I am writing now, I would use labels like "help, how to, introduction, posting". For your photo entries, I would use labels like "summer assignment, scavenger hunt"
Be sure to click "Save Now" often while you are typing your entry so you don't lose your work if your computer crashes. This will keep your post as a "Draft" until you are ready to publish it to the blog. When you are ready to publish your post, click "Publish Post" and then it will show up on the blog!
5. EDITING POSTS
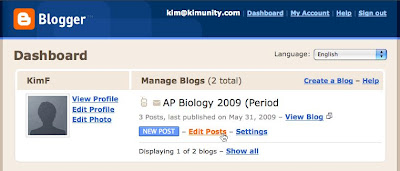
If you are still working on a post and want to come back to it, or if you need to change something on a post you have published, then in your Dashboard click the "Edit posts" link:
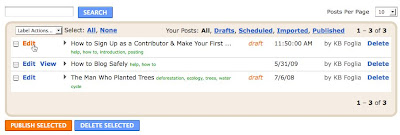
This will bring you to the list of Posts and Drafts that have been published on this blog. Click on the post you want to edit and type away! You will only be able to edit the posts that you have authored.
 6. SUGGESTIONS FOR YOUR SUMMER ASSIGNMENT
- You need to publish about 50 photos. But don't make a new blog entry everytime you want to publish photos. Publish all your photos in ONE blog entry. That means make a blog entry for your Summer Scavenger Hunt assignment and keep adding your photos to that same entry. So each time you come back to the blog, go and EDIT your original blog post.
- You will notice that Blogger has one irritating glitch that will affect you often. When you add a photo or any image to your blog entry, Blogger usually puts that image at the top of your whole post. The way I deal with that is once I place the image in the post I am writing, I scroll to the top of the page, click on the image to select it, cut the image and then paste it where I actually want it in the blog.
The easiest way to deal with this in your Summer Photo collection is just add the newest photos to the top of your blog and keep them there. So your Summer Collection will have the newest photos on the top and the oldest photos on the bottom. Got it?
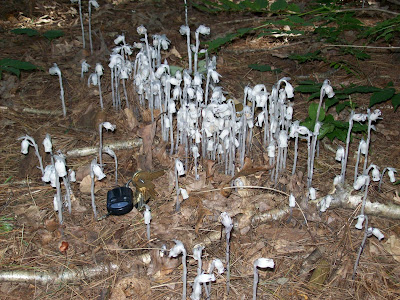
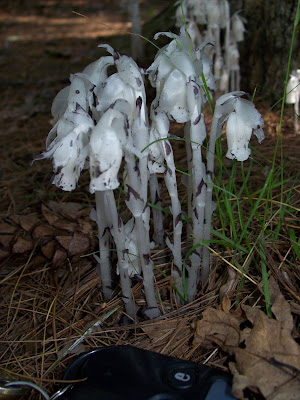
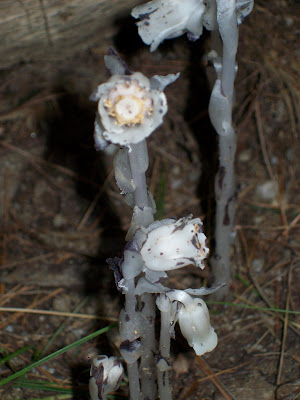
- Photo Descriptions? These do not have to be long explanations. They can just be a few lines that clearly state what Biology Scavenger Hunt category your photo is depicting and how it clearly satisfies that category, like this:
PARASITISM: The photos below are of the parasitic flowering plant called "Indian Pipe" that is growing in the woods in my yard. This odd-looking plant is white instead of green because it is non-photosynthetic, so it must get its nutrition by parasitizing other organisms -- stealing its nutrition from other creatures. Interestingly, Indian Pipe is parasitic on an underground fungus called a mycorrhizae. The mycorrhizal fungus, in turn, gets its nutrition by stealing it from green plants in a mutualistic relationship (but that's another story!). In short, the tree sends its sugars produced in photosynthesis to the fungus which lives amongst the plant's roots, the fungus then unknowingly passes some of the sugars along to the thieving Indian pipe. So what you have here is an intertwined, three-way relationship between a photosynthetic tree, a mycorrhizal fungus, and a parasitic plant! See even plants & fungi live wild, complicated lives!
No comments:
Post a Comment
Note: Only a member of this blog may post a comment.